
Istio ‘helloworld’ 데모

이번 포스트에서는 Istio에서 제공하는 helloworld 예제를 활용해 Istio의 Virtual Service와 Destination Rule의 기능들을 직접 실험해본다. 🧪
사전 준비
일단 hello 예제를 띄울 네임스페이스에 label을 부여해서 envoy sidecar가 붙을 수 있도록 만들자.
kubectl label ns default istio-injection=enabled
그리고 앞선 포스트를 참고해 Istio와 Kiali, Prometheus Addon을 설치한다.
➡️ Install Istio and Addons(Prometheus, Kiali)
helloworld 어플리케이션
istio의 예제 중 가장 심플한 녀석으로 /hello 엔드포인트에 요청을 보내면, 자신의 버전 정보를 리턴한다.
$ curl -X GET localhost:5000/hello
Hello version: v1, instance: helloworld-v1-867747c89-n6sl2
우선 요 어플리케이션을 배포해보자!
$ kubectl apply -n default -f https://raw.githubusercontent.com/istio/istio/1.26.1/samples/helloworld/helloworld.yaml
service/helloworld created
deployment.apps/helloworld-v1 created
deployment.apps/helloworld-v2 created
그러면, 버전 v1, v2의 helloworld 어플리케이션이 배포된다.
지금 만들어진 service/helloworld는 v1, v2를 round robin으로 트래픽을 분산한다.
테스트를 위해 아래 명령어로 임시 Pod을 띄워서 트래픽 라우팅이 어떻게 되는지 확인해보자. (이때, k port-forward한 걸로 접속하면 안 된다. 그 이유는 요 깃헙 이슈를 참고)
$ kubectl run nginx --image=nginx
$ kubectl exec -it nginx -- sh
# <on some pod>
while true; do curl "http://helloworld.default:5000/hello"; done
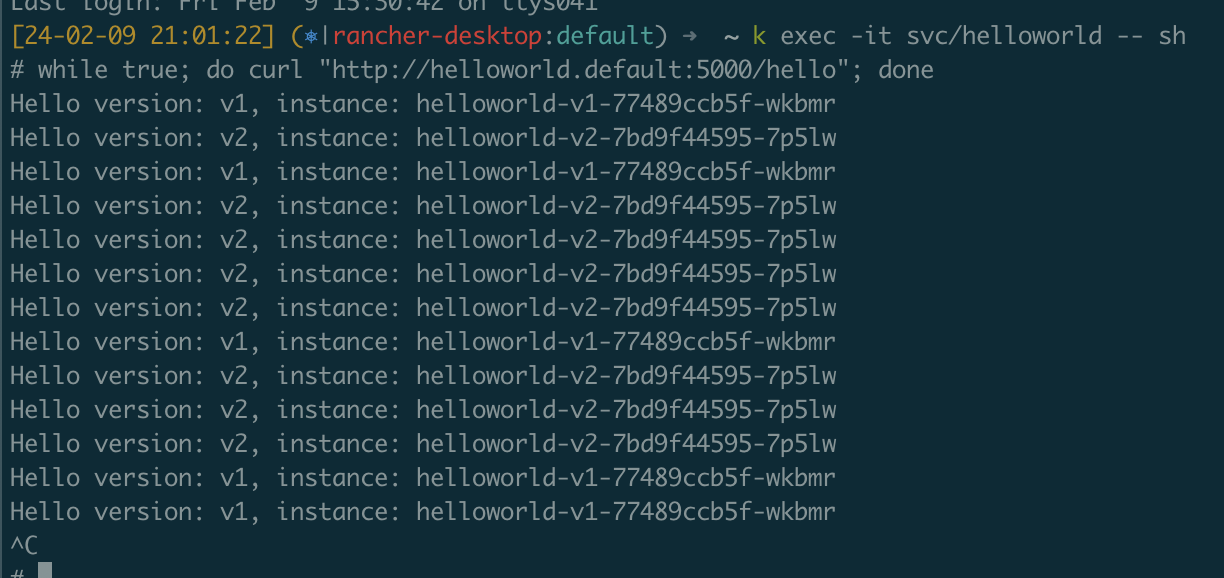
v1 5회, v2 8회. 거의 반반 정도로 라우팅 된다!
안녕, Virtual Service!
그럼 이제 istio의 Virtual Service로 v1과 v2의 트래픽 비율을 조절해보자!
일단 지금은 v1, v2 둘을 같이 쓰는 K8s Service 하나만 구성했는데, 각각으로 라우팅 하는 새로운 K8s Service 둘을 구성하자.
$ kubectl apply -f - <<EOF
apiVersion: v1
kind: Service
metadata:
  name: helloworld-v1
  labels:
    app: helloworld
    service: helloworld
    version: v1
spec:
  ports:
  - port: 5000
    name: http
  selector:
    app: helloworld
    version: v1
---
apiVersion: v1
kind: Service
metadata:
  name: helloworld-v2
  labels:
    app: helloworld
    service: helloworld
    version: v2
spec:
  ports:
  - port: 5000
    name: http
  selector:
    app: helloworld
    version: v2
EOF
그리고 아래와 같이 Virtual Service를 구성해서, v1에는 20% 트래픽이, v2에는 80%의 트래픽이 흐를 수 있도록 구성해보자.
# simple-virtual-service
kubectl apply -f - <<EOF
apiVersion: networking.istio.io/v1
kind: VirtualService
metadata:
  name: helloworld-vs
spec:
  hosts:
  - "helloworld.default.svc.cluster.local"
  http:
  - route:
    - destination:
        host: helloworld-v1.default.svc.cluster.local
      weight: 20 # 20% 트래픽
    - destination:
        host: helloworld-v2.default.svc.cluster.local
      weight: 80 # 80% 트래픽
EOF
위의 Virtual Service를 생성한 후에 다시 nginx Pod에 접속해서 다시 트래픽을 흘려보자.
$ kubectl get vs
$ kubectl run nginx --image=nginx -it --rm -- sh
# <on nginx pod>
while true; do curl "http://helloworld.default:5000/hello"; sleep 1; done
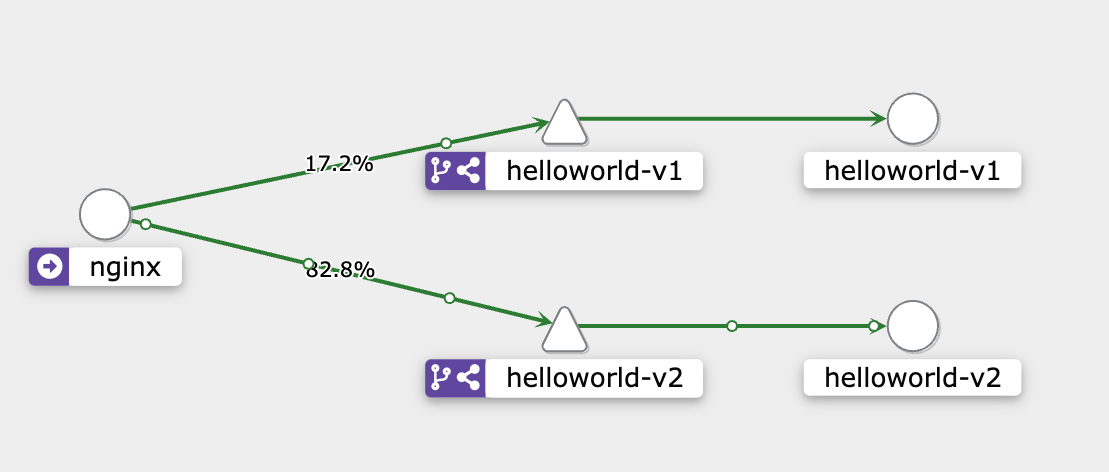
와우!! 트래픽의 20:80 비율로 분산되었다!! ദ്ദി ˉ͈̀꒳ˉ͈́ )✧
Gateway와 함께 Virtual Service를 구성
istio에서 제공하는 예제에서는 helloworld-gateway.yaml라는 파일에 IngressGateway와 VirtualService를 정의해서 제공하고 있다.
이번에는 IngressGateway와 함께 VirtualService를 구성해보자.
일단 Gateway 이렇게 정의하자.
kubectl apply -f - <<EOF
apiVersion: networking.istio.io/v1
kind: Gateway
metadata:
  name: helloworld-gateway
spec:
  selector:
    istio: ingressgateway # use istio default controller
  servers:
  - port:
      number: 80
      name: http
      protocol: HTTP
    hosts:
    - "*"
EOF
그리고 VirtualService는 이렇게 구성한다. 이번에는 구분을 위해서 v1:v2를 70:30으로 구성하자. 이번에는 v1 트래픽이 더 많다!
# hellworld-vs-with-gateway.yaml
apiVersion: networking.istio.io/v1
kind: VirtualService
metadata:
  name: helloworld-gateway-vs
spec:
  hosts:
  - "*"
  gateways:
  - helloworld-gateway
  http:
  - route:
    - destination:
        host: helloworld-v1.default.svc.cluster.local
        port:
          number: 5000
      weight: 70 # 70% 트래픽
    - destination:
        host: helloworld-v2.default.svc.cluster.local
        port:
          number: 5000
      weight: 30 # 30% 트래픽
그리고 또 nginx Pod에 접속해서 트래픽을 흘려보자. 그런데 이번에는 default ns에 있는 helloworld의 Service가 아니라 istio-system ns에 있는 istio-ingressgateway에 트래픽을 보내야 한다.
$ kubectl apply -f helloworld-gateway.yaml
$ kubectl apply -f helloworld-vs-with-gateway.yaml
$ kubectl exec -it nginx -- sh
# <on nginx pod>
while true; do curl "http://istio-ingressgateway.istio-system/hello"; done
Kiali에서 트래픽을 확인해보면,
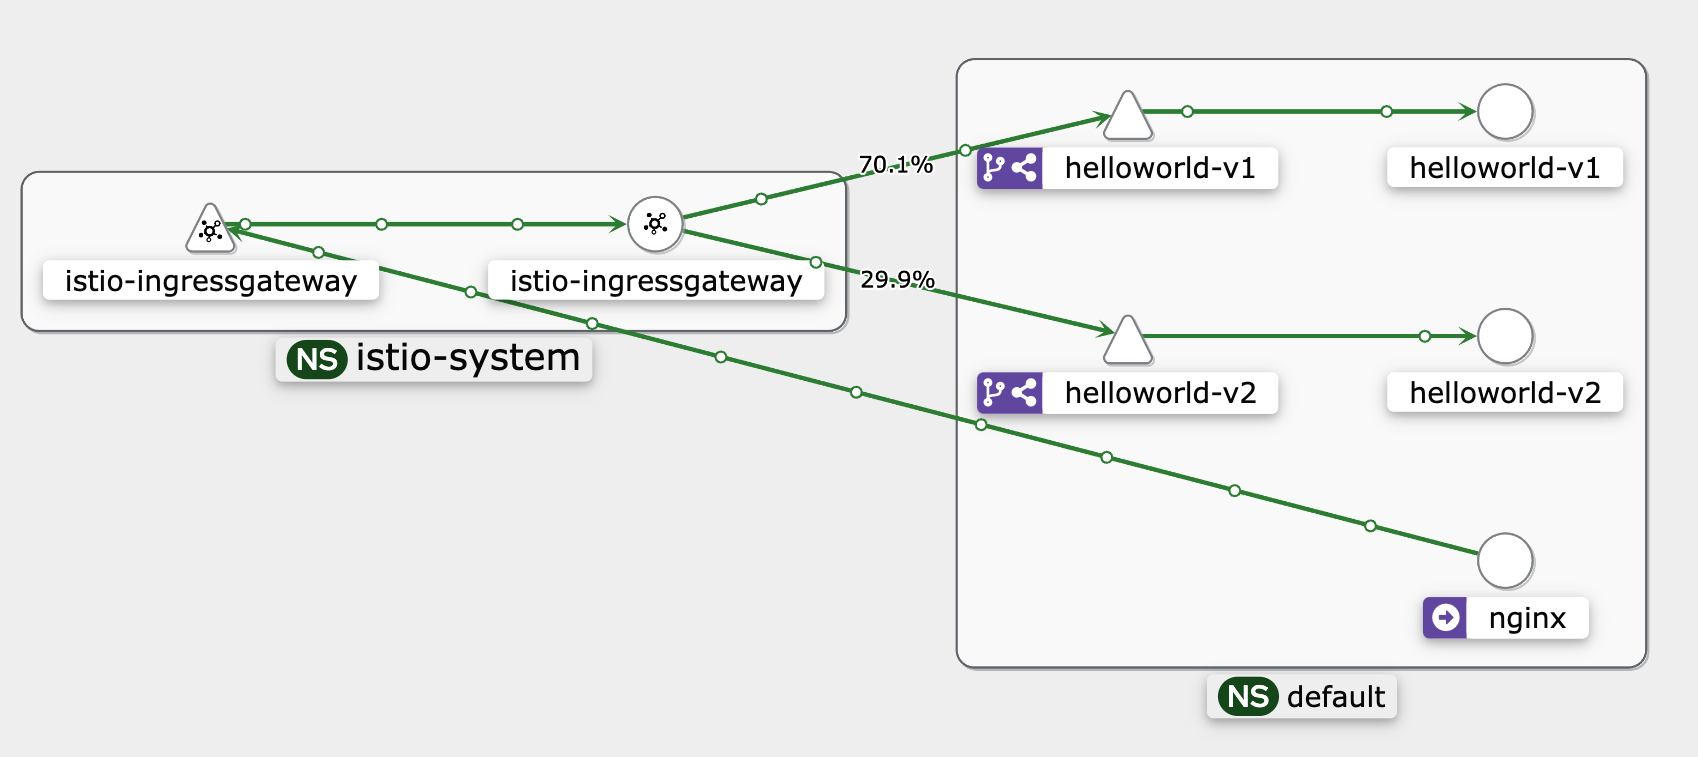
와웅! 이번에는 istio의 default ingress gateway를 통해서 트래픽이 분산되고 있다! ٩(^ᗜ^ )و
VirtualService와 Gateway 조금 더보기
요 부분은 VirtualService와 Gateway 리소스에 대해 조금더 깊은 내용을 다룬다. 이 부분을 스킵해도 helloworld 예제를 진행하는데 문제가 없으니, Istio에 입문한지 얼마 되지 않았다면, 과감히 DestinationRule을 쓰는 다음 단계로 넘어가자!
여기서 잠깐! IngressGateway와 함께 쓰면서, VirtualService에서 바뀐 부분은 hosts와 gateways 부분이다.
apiVersion: networking.istio.io/v1
kind: VirtualService
metadata:
  name: helloworld-vs-w-gateway
spec:
  hosts: # 요기!
  - "*"
  gateways: # 요기도!
  - helloworld-gateway
  ...
이때, hosts 부분은 *라는 와일드카드(wildcard)가 사용되었는데, 이 와일드카드는 오직 gateways 속성과 함께 쓸 수 있다. 만약 gateways와 함께 쓰지 않는다면, 아래의 에러를 보게 된다.
admission webhook “validation.istio.io” denied the request:
configuration is invalid: wildcard host * is not allowed for virtual services bound to the mesh gateway
이때, “mesh gateway“라는 표현이 등장하는데, 간단하게 말하자면, istio의 전체 sidecar proxy의 모음을 말한다. 즉, sidecar 전체를 대상으로 할 때는 wildcard host *를 사용할 수 없다는 것이다.
다행히 우리는 helloworld-gateway라고 gateway를 명시해줘서 wildcard host *를 사용하고 있다. wildcard host로 명시했기 때문에 helloworld-gateway에서 들어오는 모든 요청을 요 VirtualService에서 처리하게 된다!
그런데, hosts에 wildcard host *를 쓰는 부분은 또 있다. 바로 istio Gateway 리소스의 요 부분이다.
apiVersion: networking.istio.io/v1
kind: Gateway
metadata:
  name: helloworld-gateway
spec:
  selector:
    istio: ingressgateway # use istio default controller
  servers:
  - port:
      number: 80
    hosts:
    - "*" # 요기!
Gateway의 spec.servers[].hosts 부분은 ingress gateway가 노출하는 포트를 사용할 VirtualService의 hosts에 대한 조건을 명시한다. 만약, Gateway serversp[].hosts 값이 *.example.com 였다면, dev.example.com과 prod.example.com를 host로 갖는 VirtualService는 해당 Gateway를 사용할 수 있지만, example.com이나 newexample.com를 host로 갖는 VirtualService는 해당 Gateway를 사용할 수 없다.
이번 경우는 Gateway에서 wildcard host *로 전체 허용했기 때문에 어떤 VirtualService도 helloworld-gateway를 사용할 수 있었다!
안녕, Destination Rule!
이번엔 DestinationRule 리소스와 VirtualService를 조합해서 트래픽을 분산해보자!
일단 시작에 앞서 앞에서 만들어뒀던 리소스는 모두 지워두자. 첫 예제에서 만들어뒀던 v1, v2의 K8s Service까지 둘다 지운다!
kubectl delete vs helloworld-vs-w-gateway
kubectl delete gw helloworld-gateway
kubectl delete svc helloworld-v1 helloworld-v2
이제 아래와 같이 DestinationRule을 정의하고 apply 해보자!
# helloworld-dr.yaml
apiVersion: networking.istio.io/v1
kind: DestinationRule
metadata:
  name: helloworld-dr
spec:
  host: helloworld.default.svc.cluster.local
  subsets: # subset들을 정의하자!
  - name: helloworld-v1
    labels:
      version: v1
  - name: helloworld-v2
    labels:
      version: v2
그리고 아래와 같이 VirtualService를 구성한다.
# helloworld-vs-w-dr.yaml
apiVersion: networking.istio.io/v1
kind: VirtualService
metadata:
  name: helloworld-vs-w-dr
spec:
  hosts:
  - "helloworld.default.svc.cluster.local"
  http:
  - route:
    - destination:
        host: helloworld.default.svc.cluster.local
        subset: helloworld-v1 # 이번에는 subset을 쓴다!
      weight: 70 # 70% 트래픽
    - destination:
        host: helloworld.default.svc.cluster.local
        subset: helloworld-v2
      weight: 30 # 30% 트래픽
리소스를 만든 후에 트래픽을 흘려주면…
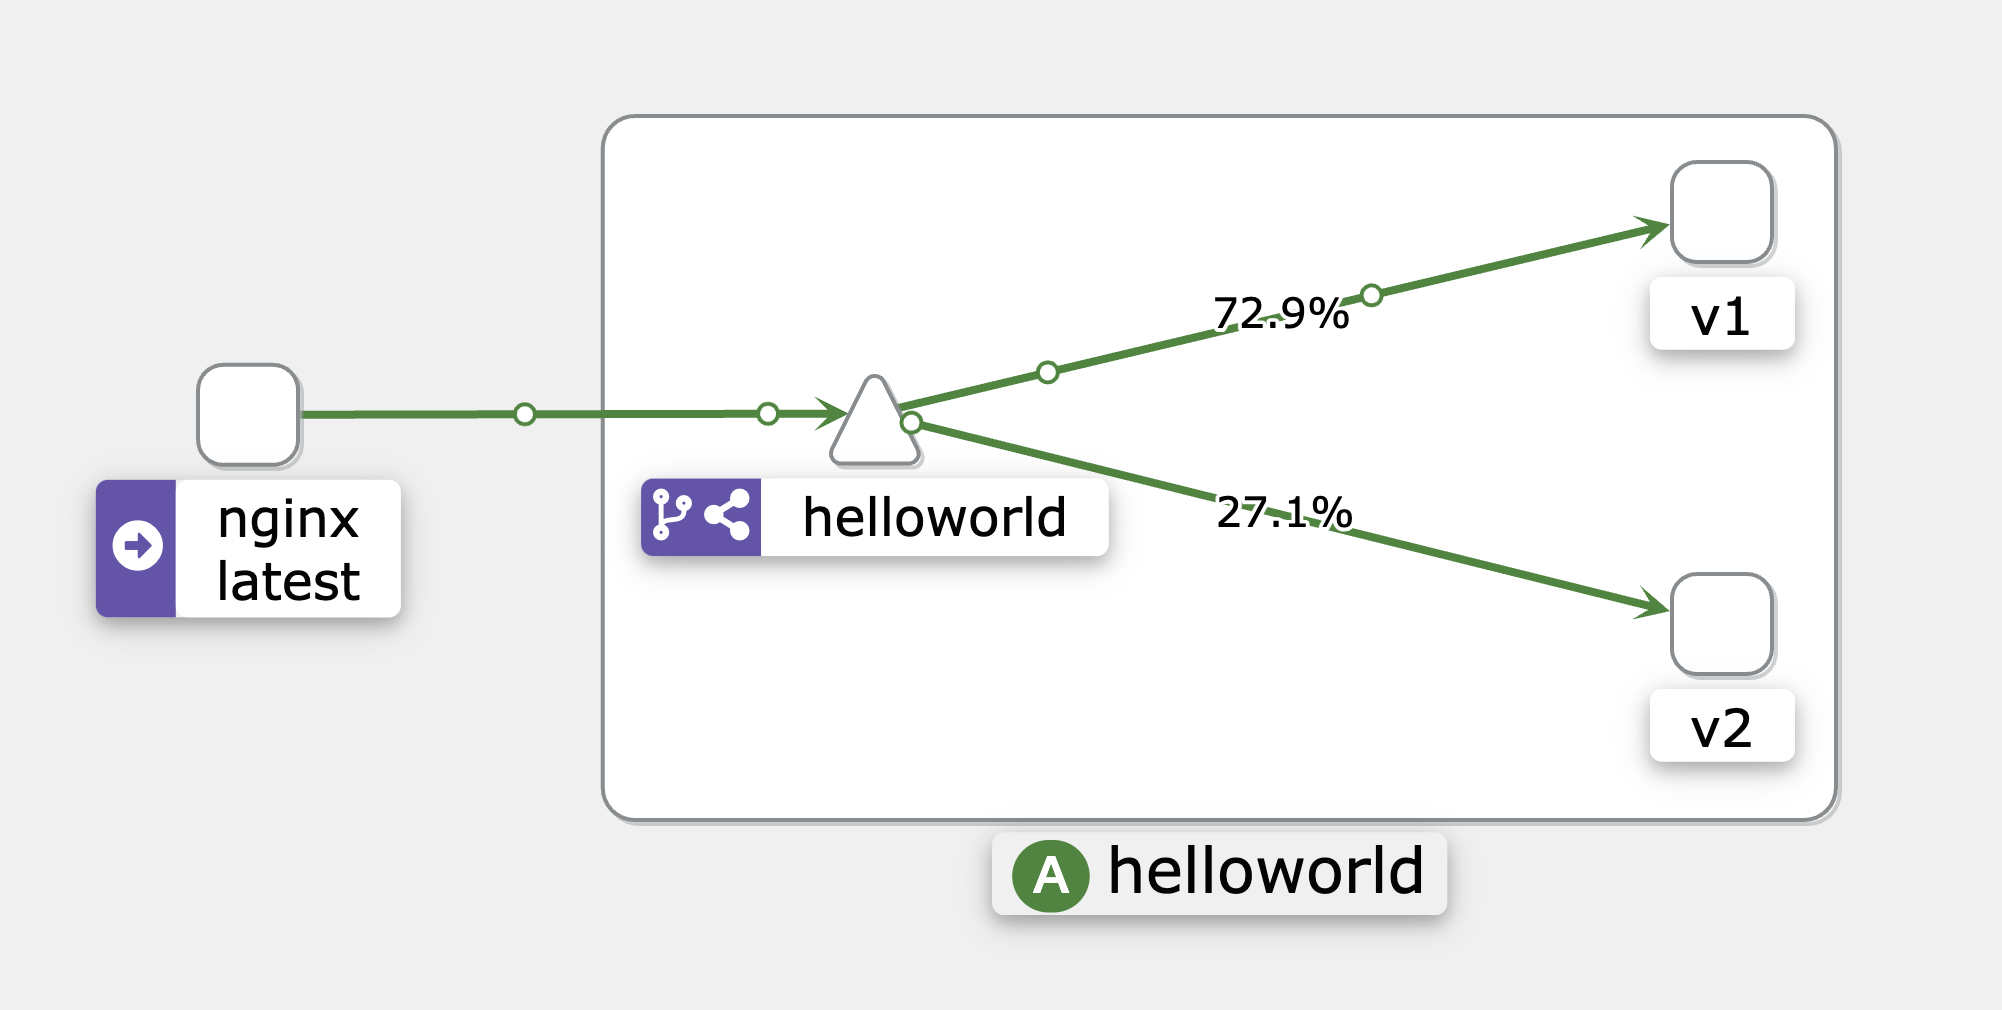 DestinationRule로 버전별 subset을 만들었을 때
와우! 이번에도 트래픽이 비율대로 잘 분산되었다!! 놀라운 점은 각 버전에 대응되는 K8s Service를 만들지 않고, DestinationRule에서 selector로 subset을 만들기만 했던 것이다!!
버전에 대응되는 K8s Service를 만들었을 때
맺음말

지금까지 helloworld 예제를 통해 Istio VirtualService, Gateway, DestinationRule의 아주 기본적인 사용법을 익혔다!
Istio라는 녀석이 처음보면 각 컴포넌트들이 얽기설기 엮여 있여서 파악하기가 어려웠던 것 같다. 특히 이미 Istio로 서비스메시가 구축된 상태에서 Istio를 받아들이려고 하니 특히 머리가 더 복잡했던 것 같다 (𖦹ᯅ𖦹)
다음으론 Istio에서 제공하는 Book Info 예제를 한번 실습하고 정리해보려고 한다. 그럼 빠잉!